
Eezebilt models.
3 posters
Page 1 of 1

Eezebilt models.
![]() Mazak Mon Sep 24, 2012 9:27 pm
Mazak Mon Sep 24, 2012 9:27 pm
My first posting on this site....
I am at the moment building an enlarged Curlew (150% larger ) after building the original a little while ago. I have also built the Mermaid (as per drawing) using a combination of cardboard and balsa wood. The Curlew was built entirely from cardboard such as found on the back of writing pads.
I have in the past built small models of 9 inches length using cardboard only sealing with cellulose dope. This I have found to be adequate along with a couple of coats of paint. So I did the same with the Eezebilt models but added a layer of tissue and dope.
I feel that the Eezebilt models could do with a deeper keel to give more "body" at the bows and also could do with more freeboard, the deck is too near the water line. OF course in the days when they were designed they didn't have to carry radio gear even though a 4.5 battery was heavy enough for a small boat. Anyway I just wondered if there was anyone else interested in these models or methods and materials used in their construction.
Mazak- Posts : 18
Join date : 2012-09-24
Age : 82
Location : Cornwall
Re: Eezebilt models.
![]() Dodgy Geezer Mon Sep 24, 2012 11:15 pm
Dodgy Geezer Mon Sep 24, 2012 11:15 pm
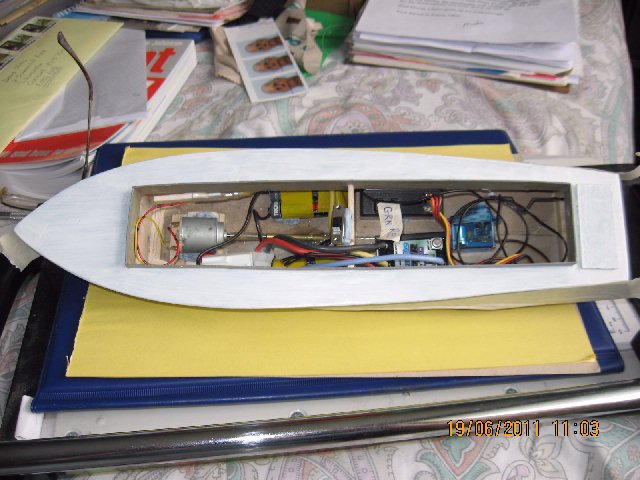
I think that this is one of your models..?

Dodgy Geezer- Posts : 22
Join date : 2012-09-23 -

Re: Eezebilt models.
![]() Mazak Tue Sep 25, 2012 2:44 am
Mazak Tue Sep 25, 2012 2:44 am
Yes, that is my original Curlew built using cardboard from the backs of writing pads, here below is some of my emails on my enlarged Curlew using again cardboard but the type that photographers use when mounting photos in their frames.
These are comments during the build process of an enlarged Curlew 150% actually.
One alteration I have made was to make the keel a little deeper, so I'm hoping that will serve the same purpose as when the chine is lifted at the bows. I imagine that being bigger its going to be that bit heavier also, I would probably put a larger motor in it plus an extra battery cell. I used that cardboard that is used for photo framing, I'm not convinced that it is such a good idea but we have to try these things to find out, Im also in the process of doing the side skins which I have done in 1/8 balsa, I might even cover the deck in 1/16 ply, the point being that the whole boat will be encased in balsa and plywood. I also made the keel 1/4 inch thick, to give a good joint with the underside skin, as I have put strips of balsa along the edges also. on the chine and gunwhales.
Strange to relate it doesn't feel all that heavy so far. I also discovered that it has grown by one inch, as it is in fact 16 inches long, I know I added a 1/4 inch thick transom to the cardboard one, anyway not to worry, I think I have done the more difficult bit, it should be relatively easy from now on?
I have already printed the drawings enlarged to 150% for Mermaid, but I'm not sure what length that will be.
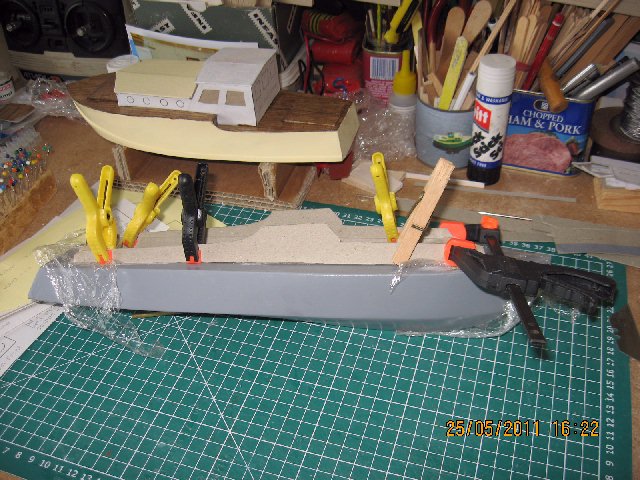
If I did another Curlew at this size I wouldn't bother with all the bits of framing I would make standard bulkheads. or make the chine platform and build from there, The keel hangs down by a good 1" at its deepest point from the chine, so I don't think it will plough its way through the water, I often feel the keels are not deep enough on the Eezibilt models, nor is there much freeboard, I'm not sure but I think I added a bit to the keel on the original Mermaid.... anyway time will tell. I can send you a photo of the boat as it is at the moment before I trim the edges and start on the underside of the hull. I can do that tomorrow, I have however attached a photo of Curlew as it was this morning. You can see the strips of balsa along the edges, it also serves the purpose of holding the pins while the glue sets after fitting the skins! I have to admit though that having the use of a bandsaw makes light work of cutting the cardboard as it is pretty tough stuff to cut through even with a stanley knife. The main problem with it ( the cardboard) is that the glue (PVA) doesn't penetrate as much as it does when using balsa wood.
Anyway as they say so far so good....the other problem with larger models is the bath isn't quite big enough to try them out in..LOL err sorry, indoor test facility!
I enlarged the original drawings on my printer to 150% so it comes out at roughly 15 inches long.
I'm using cardboard which I was given by this photo framing shop, its about 1/16 thick, very stiff but cuts fairly nice on a band saw, cutting it with a stanley knife is rather like hard work. Anyway I have attached a photo of what I have done so far. I laid a piece of carbon paper with the ink upwards and then traced the shape onto the paper so that it would match the one I had enlarged...then I stuck the two together and traced the shaped onto a piece of board which the eliminated me having to stick them together as per the instructions, my explanation may sound a bit confusing but I'm sure you can see the idea from the photo. Anyway so far so good. I may use balsa when it comes to the hull, but some of the rest will be done in this card, I'm sure it will be heavier than using balsa but its all part of an experiment.
I'll take some more photos as the job progresses, along with any alterations I make, (if any)
Best wishes David.
PS. I made a footy in plywood and then I printed the drawing on a standard A4 printer which came out at 9 inches, I made it using cardboard, the whole boat is made using cardboard from the back of writing pads...anyway compared to the otter I would say that my 9inch model could be made to look like an Ezzebilt Otter and it certainly wouldn't roll over. I'm sure it could even be built like an ezebilt model.
Mine is powered with a servo motor plus the electronics. It goes remarkably well, even sailed on Loch Ken, ( I've even sailed it in a large puddle)
Made in plywood it would be an even better job as cardboard seems to have a tendency to curve over a period of time after you have applied cellulose dope. Unless its my heavy dabs holding it?
I just thought I would mention that. DWS
Hello,
It might be an interesting experiment to try cutting card with a laser, you still have to give it a few coats of cellulose dope thinned then a layer of tissue even if you use balsa wood, personally I think balsa wood is still the better material. This card which they use when framing photos is multi layered, still as my model will be encased in Balsa wood and ply it would have made more sense to make the frames etc from Balsa. At least I have kept faith with the design and made the sections as per the original. I have however more faith in the cardboard from the back of writing pads or some that is a little thicker as its that bit easier to cut and it does take the dope pretty well and given enough coats is quite strong.
The other factor I have noticed with these eezebilt models is there isn't much free board. I keep feeling inclined to increase that as well as deepening the keel.
Anyway here is a couple more photos of progress so far. One of the model with his ( should that be a her? ) pins in to hold the balsa while the glue goes off and another with the excess trimmed off. It is now ready for the underside skin.
I dont know if I mentioned it but this model boat seems to have grown an extra inch, where from I don't know but it is now 16inches long. Still its near enough 3 to 1 ratio for the type of hull that it is. (Length divided by the beam.)
I have to say though the 21 inch Curlew on the web page looks really smart, you could easily take it for a real boat!
I'll have to measure up the enlarged mermaid as that has been enlarged same size as Curlew ie: 150%
Yes the band saw does make life a lot easier, it was given to me by a fellow model boat builder when he was given a new machine, its rather old and makes quite a noise but it does make light work of cutting plywood, cardboard and even balsa wood, especially the thicker sizes. If the radius isn't too sharp it can even go around in curves.
I suppose we can trust the Americans to go one better with their laser cutters..:-)
If you look at the EeZeBilt designs you can see that the need to make the bow perform better was noticed, and several models have some feature to do this. The Mermaid uses the technique you suggest, of an increased keel, particularly at the bow. Cutting card with a bandsaw must make the whole job quite easy, and therefore more accurate.
Several other EeZeBilt followers (mainly in America!) have got laser cutters and are using these. I wonder if a laser-cut card set of parts would make a good cheap kit...?
DG
These are comments during the build process of an enlarged Curlew 150% actually.
One alteration I have made was to make the keel a little deeper, so I'm hoping that will serve the same purpose as when the chine is lifted at the bows. I imagine that being bigger its going to be that bit heavier also, I would probably put a larger motor in it plus an extra battery cell. I used that cardboard that is used for photo framing, I'm not convinced that it is such a good idea but we have to try these things to find out, Im also in the process of doing the side skins which I have done in 1/8 balsa, I might even cover the deck in 1/16 ply, the point being that the whole boat will be encased in balsa and plywood. I also made the keel 1/4 inch thick, to give a good joint with the underside skin, as I have put strips of balsa along the edges also. on the chine and gunwhales.
Strange to relate it doesn't feel all that heavy so far. I also discovered that it has grown by one inch, as it is in fact 16 inches long, I know I added a 1/4 inch thick transom to the cardboard one, anyway not to worry, I think I have done the more difficult bit, it should be relatively easy from now on?
I have already printed the drawings enlarged to 150% for Mermaid, but I'm not sure what length that will be.
If I did another Curlew at this size I wouldn't bother with all the bits of framing I would make standard bulkheads. or make the chine platform and build from there, The keel hangs down by a good 1" at its deepest point from the chine, so I don't think it will plough its way through the water, I often feel the keels are not deep enough on the Eezibilt models, nor is there much freeboard, I'm not sure but I think I added a bit to the keel on the original Mermaid.... anyway time will tell. I can send you a photo of the boat as it is at the moment before I trim the edges and start on the underside of the hull. I can do that tomorrow, I have however attached a photo of Curlew as it was this morning. You can see the strips of balsa along the edges, it also serves the purpose of holding the pins while the glue sets after fitting the skins! I have to admit though that having the use of a bandsaw makes light work of cutting the cardboard as it is pretty tough stuff to cut through even with a stanley knife. The main problem with it ( the cardboard) is that the glue (PVA) doesn't penetrate as much as it does when using balsa wood.
Anyway as they say so far so good....the other problem with larger models is the bath isn't quite big enough to try them out in..LOL err sorry, indoor test facility!
I enlarged the original drawings on my printer to 150% so it comes out at roughly 15 inches long.
I'm using cardboard which I was given by this photo framing shop, its about 1/16 thick, very stiff but cuts fairly nice on a band saw, cutting it with a stanley knife is rather like hard work. Anyway I have attached a photo of what I have done so far. I laid a piece of carbon paper with the ink upwards and then traced the shape onto the paper so that it would match the one I had enlarged...then I stuck the two together and traced the shaped onto a piece of board which the eliminated me having to stick them together as per the instructions, my explanation may sound a bit confusing but I'm sure you can see the idea from the photo. Anyway so far so good. I may use balsa when it comes to the hull, but some of the rest will be done in this card, I'm sure it will be heavier than using balsa but its all part of an experiment.
I'll take some more photos as the job progresses, along with any alterations I make, (if any)
Best wishes David.
PS. I made a footy in plywood and then I printed the drawing on a standard A4 printer which came out at 9 inches, I made it using cardboard, the whole boat is made using cardboard from the back of writing pads...anyway compared to the otter I would say that my 9inch model could be made to look like an Ezzebilt Otter and it certainly wouldn't roll over. I'm sure it could even be built like an ezebilt model.
Mine is powered with a servo motor plus the electronics. It goes remarkably well, even sailed on Loch Ken, ( I've even sailed it in a large puddle)
Made in plywood it would be an even better job as cardboard seems to have a tendency to curve over a period of time after you have applied cellulose dope. Unless its my heavy dabs holding it?
I just thought I would mention that. DWS
Hello,
It might be an interesting experiment to try cutting card with a laser, you still have to give it a few coats of cellulose dope thinned then a layer of tissue even if you use balsa wood, personally I think balsa wood is still the better material. This card which they use when framing photos is multi layered, still as my model will be encased in Balsa wood and ply it would have made more sense to make the frames etc from Balsa. At least I have kept faith with the design and made the sections as per the original. I have however more faith in the cardboard from the back of writing pads or some that is a little thicker as its that bit easier to cut and it does take the dope pretty well and given enough coats is quite strong.
The other factor I have noticed with these eezebilt models is there isn't much free board. I keep feeling inclined to increase that as well as deepening the keel.
Anyway here is a couple more photos of progress so far. One of the model with his ( should that be a her? ) pins in to hold the balsa while the glue goes off and another with the excess trimmed off. It is now ready for the underside skin.
I dont know if I mentioned it but this model boat seems to have grown an extra inch, where from I don't know but it is now 16inches long. Still its near enough 3 to 1 ratio for the type of hull that it is. (Length divided by the beam.)
I have to say though the 21 inch Curlew on the web page looks really smart, you could easily take it for a real boat!
I'll have to measure up the enlarged mermaid as that has been enlarged same size as Curlew ie: 150%
Yes the band saw does make life a lot easier, it was given to me by a fellow model boat builder when he was given a new machine, its rather old and makes quite a noise but it does make light work of cutting plywood, cardboard and even balsa wood, especially the thicker sizes. If the radius isn't too sharp it can even go around in curves.
I suppose we can trust the Americans to go one better with their laser cutters..:-)
If you look at the EeZeBilt designs you can see that the need to make the bow perform better was noticed, and several models have some feature to do this. The Mermaid uses the technique you suggest, of an increased keel, particularly at the bow. Cutting card with a bandsaw must make the whole job quite easy, and therefore more accurate.
Several other EeZeBilt followers (mainly in America!) have got laser cutters and are using these. I wonder if a laser-cut card set of parts would make a good cheap kit...?
DG
Mazak- Posts : 18
Join date : 2012-09-24
Age : 82
Location : Cornwall
Re: Eezebilt models.
![]() Dodgy Geezer Tue Sep 25, 2012 6:47 am
Dodgy Geezer Tue Sep 25, 2012 6:47 am
I have a number of Mazak's other pictures - let's see if I can make this photo system work!
This is a Mermaid in card,
This is a Mermaid in card,
Dodgy Geezer- Posts : 22
Join date : 2012-09-23 -
Re: Eezebilt models.
![]() Dodgy Geezer Tue Sep 25, 2012 6:52 am
Dodgy Geezer Tue Sep 25, 2012 6:52 am
...and here is a card Mermaid with a Curlew in the background...
Dodgy Geezer- Posts : 22
Join date : 2012-09-23 -
Eezebilt models.
![]() Mazak Tue Sep 25, 2012 7:01 am
Mazak Tue Sep 25, 2012 7:01 am
Yes the photos do appear..... maybe they might fix it so we can upload photos directly onto the website?
Mazak- Posts : 18
Join date : 2012-09-24
Age : 82
Location : Cornwall
Re: Eezebilt models.
![]() Her in doors Tue Sep 25, 2012 8:58 am
Her in doors Tue Sep 25, 2012 8:58 am
Hi Mazak
This forum is a free forum which we use as the Club has no club funds to pay for a forum. With free forums you cannot upload photo's direct to the forum, you can upload them to a image hoster and attach the link to your post so that your photo's appear in your post. If you open a free account at servimg.com, you can upload your photo's that that host site. You then copy the URL link which is shown when you click on the link icon next to your photo and then paste that link into your post and hey presto your photo appears. It sounds fiddly but once you've tried it its actually fairly straight foward.
Regards,
Marie

Her in doors- Posts : 7
Join date : 2012-09-14
Location : Leicester -
posting photos
![]() Mazak Sat Sep 29, 2012 8:17 am
Mazak Sat Sep 29, 2012 8:17 am
Thank you Marie, I have followed Dodgy geezers instructions and I see they are similar to those you gave me, so now I have managed it, as you say its a bit fiddly but it does work, so thanks again. Sorry I took so long to reply but I had to copy the text from this Mac, put it on my PC, then print it out so I had it to hand during the process.
You never know, I might over load the web site with photos..:-)
You never know, I might over load the web site with photos..:-)
Mazak- Posts : 18
Join date : 2012-09-24
Age : 82
Location : Cornwall
Page 1 of 1
Permissions in this forum:
You cannot reply to topics in this forum|
|
|